
Las Vegas Drywall Repair is pretty tough stuff, but it’s not indestructible. Minor blemishes like nail holes and dents can be touched up with paint, but cracks and water damage require a little more work.
 To fix drywall cracks, you’ll need mesh tape, joint compound, and a putty knife. First, you need to create flat surfaces on both sides of the crack.
If your drywall is suffering from small dents and cracks, this is a do-it-yourself project that most homeowners can handle. You will need a few basic supplies, including a putty knife, hot water, sandpaper or steel wool, and drywall mud (also known as “mud”).
The first step is to clean the area around the hole, using a broom or vacuum. Then sand the surface of the wall or ceiling to smooth it. Once you have done this, apply a coat of primer to the surface to prepare it for painting.
Once the primer has dried, apply a few coats of drywall joint compound. Be sure to sand in between coats, using 80-100 grit paper, to ensure that the new patch is flush with the rest of the wall.
When repairing larger holes, it is best to use a California patch. This is a piece of drywall that contains gypsum in its front, and it provides additional support to your repair. It is easy to install, simply cut a piece of drywall a few inches larger than the hole and attach it with drywall screws. Once in place, spread 20-minute mud (also called dura bond) over the backed drywall, covering about 4 inches beyond the edge of the patch.
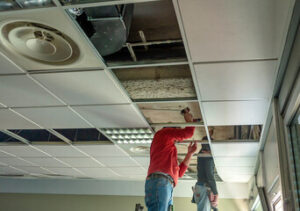
Before starting any drywall repair, it is always a good idea to locate the wall’s studs using a stud finder. This will help you avoid drilling into electrical or plumbing wires. It is also important to wear a dust mask for safety. This helps prevent inhaling drywall particles and can make the repair process easier. When you’re finished, be sure to sand the patch and surrounding surfaces with 120-grit sandpaper.
The size of the hole determines what type of repair is needed. Small holes can be patched with a patch kit that includes a self-adhesive mesh patch for quick and easy application over the existing wall surface. Larger holes need to be repaired with a drywall compound and primer combo. This method requires a bit more work but results in a surface ready to paint.
No matter what type of hole you’re dealing with, make sure that the surrounding area is smooth and free of any bumps. Random blemishes will show through a coat of paint. A smooth surface will also allow the drywall compound to adhere to the patch and blend in with the rest of the wall.
Cut out a piece of drywall for the patch that is slightly larger than the hole. The shape doesn’t matter — it’s how well the patch fits and the blending that will make the difference. Before you start cutting make sure that there are no wires in the vicinity of your patch. If there are, stick your hand in the hole to feel around and make sure that you won’t accidentally cut into any cords or other electrical components.
If you’re dealing with a hole that is causing structural issues, consider cutting out a piece of the furring strip — strips of wood nailed along the back of the drywall at a height equal to the thickness of your existing drywall. Screw these strips to the studs behind the drywall, and then anchor the new patch to the furring strips with drywall screws. Make sure that the screws are countersunk so they don’t protrude from the surface of the patch.
A drywall patch will not hide properly unless it is taped correctly. This means putting on multiple thin coats of joint compound over the entire area around the patch and then sanding it down to smooth the surface. This may require several applications of each coating and waiting for the compound to dry between each application. Using this process will ensure that the patch blends into the surrounding wall, rather than looking like an obvious repair.
If you have a small amount of sanding to do, try to do it while the compound is still slightly wet. This will help the sanding go much faster and easier. The last thing you want is to sand the dry patch too deeply, which could expose the drywall tape and leave the new hole visible.
For this job, you’ll need a gallon bucket of drywall compound and a roll of paper or mesh drywall tape, in addition to the tools required for the size hole you’re fixing. If you’re going to be doing a lot of these repairs, also pick up a sack of quick-setting joint compound. This type of compound dries much faster than ordinary joint compounds and doesn’t shrink as it dries, so you can apply more thin coats and sand between each.
When the first coat of mud is completely dry, use a four- or six-inch drywall knife to apply a second thin coat, extending it beyond the edges of the patch a few inches on each side. Let the second coat of mud dry, and then sand the area lightly again.
Some drywall repair kits come with self-adhesive drywall patches that cover the holes and don’t require any tape or mud. This is a quicker and less expensive way to fix smaller holes, but it’s usually better to do the work the proper way. If you do this, make sure to prime the patch before painting, as unprimed drywall will absorb the paint and may stand out in a different color than the rest of the wall.
A drywall repair job requires finesse to ensure that the patch is blended into the wall. The trick is to use a light hand and not apply too much joint compound. Too much mud makes it difficult to fit baseboard or crown moldings tight to the wall and can lead to cracking along the metal outside corner beads (a common problem that only becomes noticeable after painting).
A little sanding will make the patch nearly unnoticeable. A good rule of thumb is to apply multiple thin coats of drywall compound. This takes more time and creates more dust, but it will ensure a smooth surface.
A joint compound is typically a white powder of gypsum dust mixed with water to form a paste that’s spread onto drywall and then sanded to prepare it for paint. It’s the go-to substance for finishing up a drywall installation, but it also works well to repair small damage. A variety of types of joint compounds exist, including all-purpose, taping, and topping, each with different properties that suit specific applications.
For example, an all-purpose joint compound is thicker than a spackle and is meant to be used as a base coat for a drywall installation. It dries by evaporation of moisture, so it can dry fairly quickly for small repairs. Taping and topping compounds are thicker and can take a bit longer to dry, but they provide a smooth, durable finish that’s ideal for painting.
For medium-sized holes, you should use a specialized type of joint compound that includes reinforcing mesh. The mesh gives the mud something to bond with when it dries, which can help prevent the hole from leaking or crumbling down the line. After applying a bed coat of mud to the seams and corners with your knife, you’ll add a layer of mesh tape over the mud.
Typically, the simplest solution is to cut a patch out of another piece of drywall and secure it to the wall with wood backing strips and drywall screws. You must then tape and “mud” (apply joint compound) over the seams just like you would when installing new drywall. When done properly, the patch will be virtually invisible.
For a small nail hole, all you need is some spackle or joint compound and a putty knife or sanding block. If you’re dealing with a larger hole, however, you’ll need more than just the basics. For a square patch, for example, you’ll need a drywall saw to get a straight edge and the proper size to match your wall.
Before cutting into the wall, make sure it’s safe to do so by determining that no wires or other objects are near the area you plan on sawing. This is also a good time to check that your sanding work was successful and that there are no areas of unevenness.
A tip: Always be careful when using a saw to avoid nicking or cutting into the corner bead. This metal strip is designed to protect the drywall corner from damage, and it can be damaged by accidentally running a power tool into it or even just by someone flinging something against the wall.
Once the patch is cut and stuck in place, you can start to blend it into your wall. This is done with a special drywall compound that most drywall repairmen have on hand in large quantities. This material is applied with a putty knife that’s made for drywall repairs, rather than the kind of utility knife you might use for wood filler. It’s then smoothed and feathered around the edges to help it match the rest of the wall.